Getting Started
The Mizuhiki SDK enables projects built on JSC to integrate Mizuhiki ID features directly into your application. Verify your users' identity via their MyNumber card and issue a proof to their EVM address by minting a Mizuhiki Verified SBT.
The SDK is in private beta release. Please contact us to get access.
Once you receive your credentials, follow this guide to set up the Mizuhiki SDK for your project.
Prerequisites
Before starting with the Mizuhiki SDK, ensure you have:
- iOS
- Android
- For iOS Development:
- Xcode 16.0 or later
- iOS 16.0+ deployment target
- NFC-capable device: iPhone 8 or later for testing
- Apple Developer Program membership (required for NFC functionality) (Register here)
- For Android Development:
- Minimum SDK version 26 (Android 8.0)
- NFC-enabled Android device for testing
- General Requirements:
- Mizuhiki project credentials from JSC
- Access token for private package registry
- MyNumber card (for production testing) or compatible NFC card (for mock testing)
Terminology
| Term | Definition |
|---|---|
| eKYC | Electronic Know Your Customer - digital identity verification process |
| SBT | Soulbound Token - non-transferable NFT that proves verified identity |
| MyNumber Card | Japanese national ID card with embedded NFC chip |
| EIP-191 | Ethereum standard for signed message format |
| Mock Environment | Testing environment using simulated cards and test data |
| Production Environment | Live environment using real MyNumber cards |
| FeliCa | NFC communication technology used in Japanese IC cards |
| EVM | Ethereum Virtual Machine - blockchain execution environment |
| PII | Personally Identifiable Information - data that can be used to identify a specific individual, such as name, address, ID number |
Environment Configuration
The Mizuhiki SDK comes in 2 versions: mock and production. Choose the appropriate environment based on your development stage:
Mock Environment
Purpose: Testing and development without real MyNumber cards
Configuration:
- iOS
- Android
- SDK Version:
mizuhiki(The iOS SDK contains both version in 1 package) - Test Cards: Any FeliCa card (transport IC, Edy, WAON, etc.) or ISO/IEC 14443-4 Type-A card (contactless credit card)
- Test Password:
ABC123(universal password for all mock cards) - Restrictions: Real MyNumber cards cannot be used in mock environment
- Use Cases: Development, integration testing, CI/CD pipelines
- SDK Version:
mizuhiki-adapter-mock - Test Cards: Any FeliCa card (transport IC, Edy, WAON, etc.) or ISO/IEC 14443-4 Type-A card (contactless credit card)
- Test Password:
ABC123(universal password for all mock cards) - Restrictions: Real MyNumber cards cannot be used in mock environment
- Use Cases: Development, integration testing, CI/CD pipelines
Supported Test Cards:
| Card Type | Examples | NFC Standard |
|---|---|---|
| FeliCa Cards | Suica, Pasmo, Edy, WAON | FeliCa (Sony) |
| Type-A Cards | Contactless credit cards, some transit cards | ISO/IEC 14443-4 Type-A |
Production Environment
Purpose: Real MyNumber card verification for live applications
Configuration:
- iOS
- Android
- SDK Version:
mizuhiki(The iOS SDK contains both version in 1 package) - Required Cards: Only genuine MyNumber cards issued by Japanese government
- Password: User's actual MyNumber card password (6-16 characters)
- Security: Real cryptographic verification with government systems
- Use Cases: Production applications, real user verification
- SDK Version:
mizuhiki-adapter-prod - Required Cards: Only genuine MyNumber cards issued by Japanese government
- Password: User's actual MyNumber card password (6-16 characters)
- Security: Real cryptographic verification with government systems
- Use Cases: Production applications, real user verification
Important Warnings:
- ⚠️ Password Attempts: Incorrect password entries will lock the card
- 🏪 Card Recovery: Locked cards must be unlocked at convenience stores or city hall
- 🔒 Security: All verification data is processed through secure government channels
Environment Switching:
- iOS
- Android
// Choose environment at compile time
#if MOCK
import MizuhikiMock
let client = MizuhikiMock.makeClient(projectId: "YOUR_PROJECT_ID")
#else
import Mizuhiki
let client = Mizuhiki.makeClient(projectId: "YOUR_PROJECT_ID")
#endif
import dev.jsc.mizuhiki.adapter.prod.MizuhikiFactory
import dev.jsc.mizuhiki.adapter.mock.MizuhikiMockFactory

// Choose environment at runtime
val client = if (BuildConfig.FLAVOR == "mock") {
    MizuhikiMockFactory.makeClient(context, "YOUR_PROJECT_ID")
} else {
    MizuhikiFactory.makeClient(context, "YOUR_PROJECT_ID")
}
SDK Installation and Setup
Follow the platform-specific setup instructions for your development environment:
1. Set Up SDK Package Registry
- iOS
- Android
Due to the private beta release, the SDK must be downloaded from a private package registry. This requires setting up Swift package registry for your project. Afterwards, you can install the Mizuhiki SDK via the Xcode UI, the same as other packages.
Run these commands in Terminal:
swift package-registry set --global https://swift.cloudsmith.io/jsc/mizuhiki/
swift package-registry login https://swift.cloudsmith.io/jsc/mizuhiki/ --token YOUR_TOKEN --no-confirm
Replace YOUR_TOKEN with the token provided during beta access setup.
Configure access to the private Mizuhiki Maven repository.
Configure settings.gradle.kts:
val repositoryReadUser = "token"
val repositoryReadPassword = System.getenv("MIZUHIKI_TOKEN") // Set this environment variable

dependencyResolutionManagement {
    repositories {
        google()
        mavenCentral()
        maven {
            url = uri("https://dl.cloudsmith.io/basic/jsc/mizuhiki/maven/")
            credentials {
                username = "$repositoryReadUser"
                password = "$repositoryReadPassword"
            }
        }
    }
}
Set Environment Variable:
# Add to your shell profile (.zshrc, .bashrc)
export MIZUHIKI_TOKEN="your_token_here"
2. Install the SDK
- iOS
- Android
- Open your project in Xcode
- Go to
File → Add Package Dependencies... - In the search field, enter
mizuhiki - Provide keychain password if prompted (required for private registry access)
- Select the package and add to your target. For iOS both the mock and production SDK is included in the same package.
Package Overview:
| Package | Purpose | Required |
|---|---|---|
mizuhiki-core | Core SDK interfaces and models | ✅ Always |
mizuhiki-ui | Pre-built UI components for KYC | ✅ Recommended |
mizuhiki-adapter-mock | Mock environment for testing | 🔧 Development |
mizuhiki-adapter-prod | Production environment | 🚀 Production |
Option A: Using Version Catalog (Recommended)
Add to libs.versions.toml:
[versions]
mizuhiki = "+" # To dowload the latest version. If you want to use a specific version use the version in the following format "x.x.x"

[libraries]
mizuhiki-core = { group = "dev.jsc.mizuhiki", name = "mizuhiki-core", version.ref = "mizuhiki" }
mizuhiki-ui = { group = "dev.jsc.mizuhiki", name = "mizuhiki-ui", version.ref = "mizuhiki" }
mizuhiki-adapter-mock = { group = "dev.jsc.mizuhiki", name = "mizuhiki-adapter-mock", version.ref = "mizuhiki" }
mizuhiki-adapter-prod = { group = "dev.jsc.mizuhiki", name = "mizuhiki-adapter-prod", version.ref = "mizuhiki" }
Add to build.gradle.kts (Module: app):
android {
  defaultConfig {
      minSdk = 26 // minimum SDK config
  }

  buildFeatures {
      buildConfig = true // to allow access to BuildConfig
  }

  // to switch between mock and production environment
  flavorDimensions += "env"
      productFlavors {
          create("mock") {
              dimension = "env"
              versionNameSuffix = "-mock"
          }
          create("prod") {
              dimension = "env"
          }
      }
}

dependencies {
    // Core functionality - always required
    implementation(libs.mizuhiki.core)
    implementation(libs.mizuhiki.ui)

    // Environment adapters - include both for flexibility
    implementation(libs.mizuhiki.adapter.mock)    // Development/testing
    implementation(libs.mizuhiki.adapter.prod)    // Production releases
}
Option B: Direct Dependencies
android {

  defaultConfig {
      minSdk = 26 // minimum SDK config
  }

  buildFeatures {
      buildConfig = true // to allow access to BuildConfig
  }

  // to switch between mock and production environment
  flavorDimensions += "env"
      productFlavors {
          create("mock") {
              dimension = "env"
              versionNameSuffix = "-mock"
          }
          create("prod") {
              dimension = "env"
          }
      }
}

dependencies {
    val mizuhikiVersion = "+" // To dowload the latest version. If you want to use a specific version use the version in the following format "x.x.x"

    implementation("dev.jsc.mizuhiki:mizuhiki-core:$mizuhikiVersion")
    implementation("dev.jsc.mizuhiki:mizuhiki-ui:$mizuhikiVersion")
    implementation("dev.jsc.mizuhiki:mizuhiki-adapter-mock:$mizuhikiVersion")
    implementation("dev.jsc.mizuhiki:mizuhiki-adapter-prod:$mizuhikiVersion")
}
3. Configure NFC Capabilities
- iOS
- Android
Add NFC Tag Reading Capability:
- In the Project Navigator, select your project
- Select your app target under
TARGETS - Go to
Signing & Capabilitiestab - Ensure your Apple Developer Team is selected
- Click
+ Capabilityand addNear Field Communication Tag Reading
Configure Info.plist:
- Select the
Infotab - Add these entries under
Custom iOS Target Properties:
| Key | Type | Value |
|---|---|---|
Privacy - NFC Scan Usage Description | String | "Reading MyNumber cards for identity verification" |
ISO18092 system codes for NFC Tag Reader Session | Array | See values below |
NFC System Codes (Mock Environment):
0003(Transportation IC card)FE00(Electronic money)88B4(FeliCa Lite-S)
Production Environment: NFC system codes for production are confidential. Contact JSC when ready for production deployment.
Visual Setup Reference:
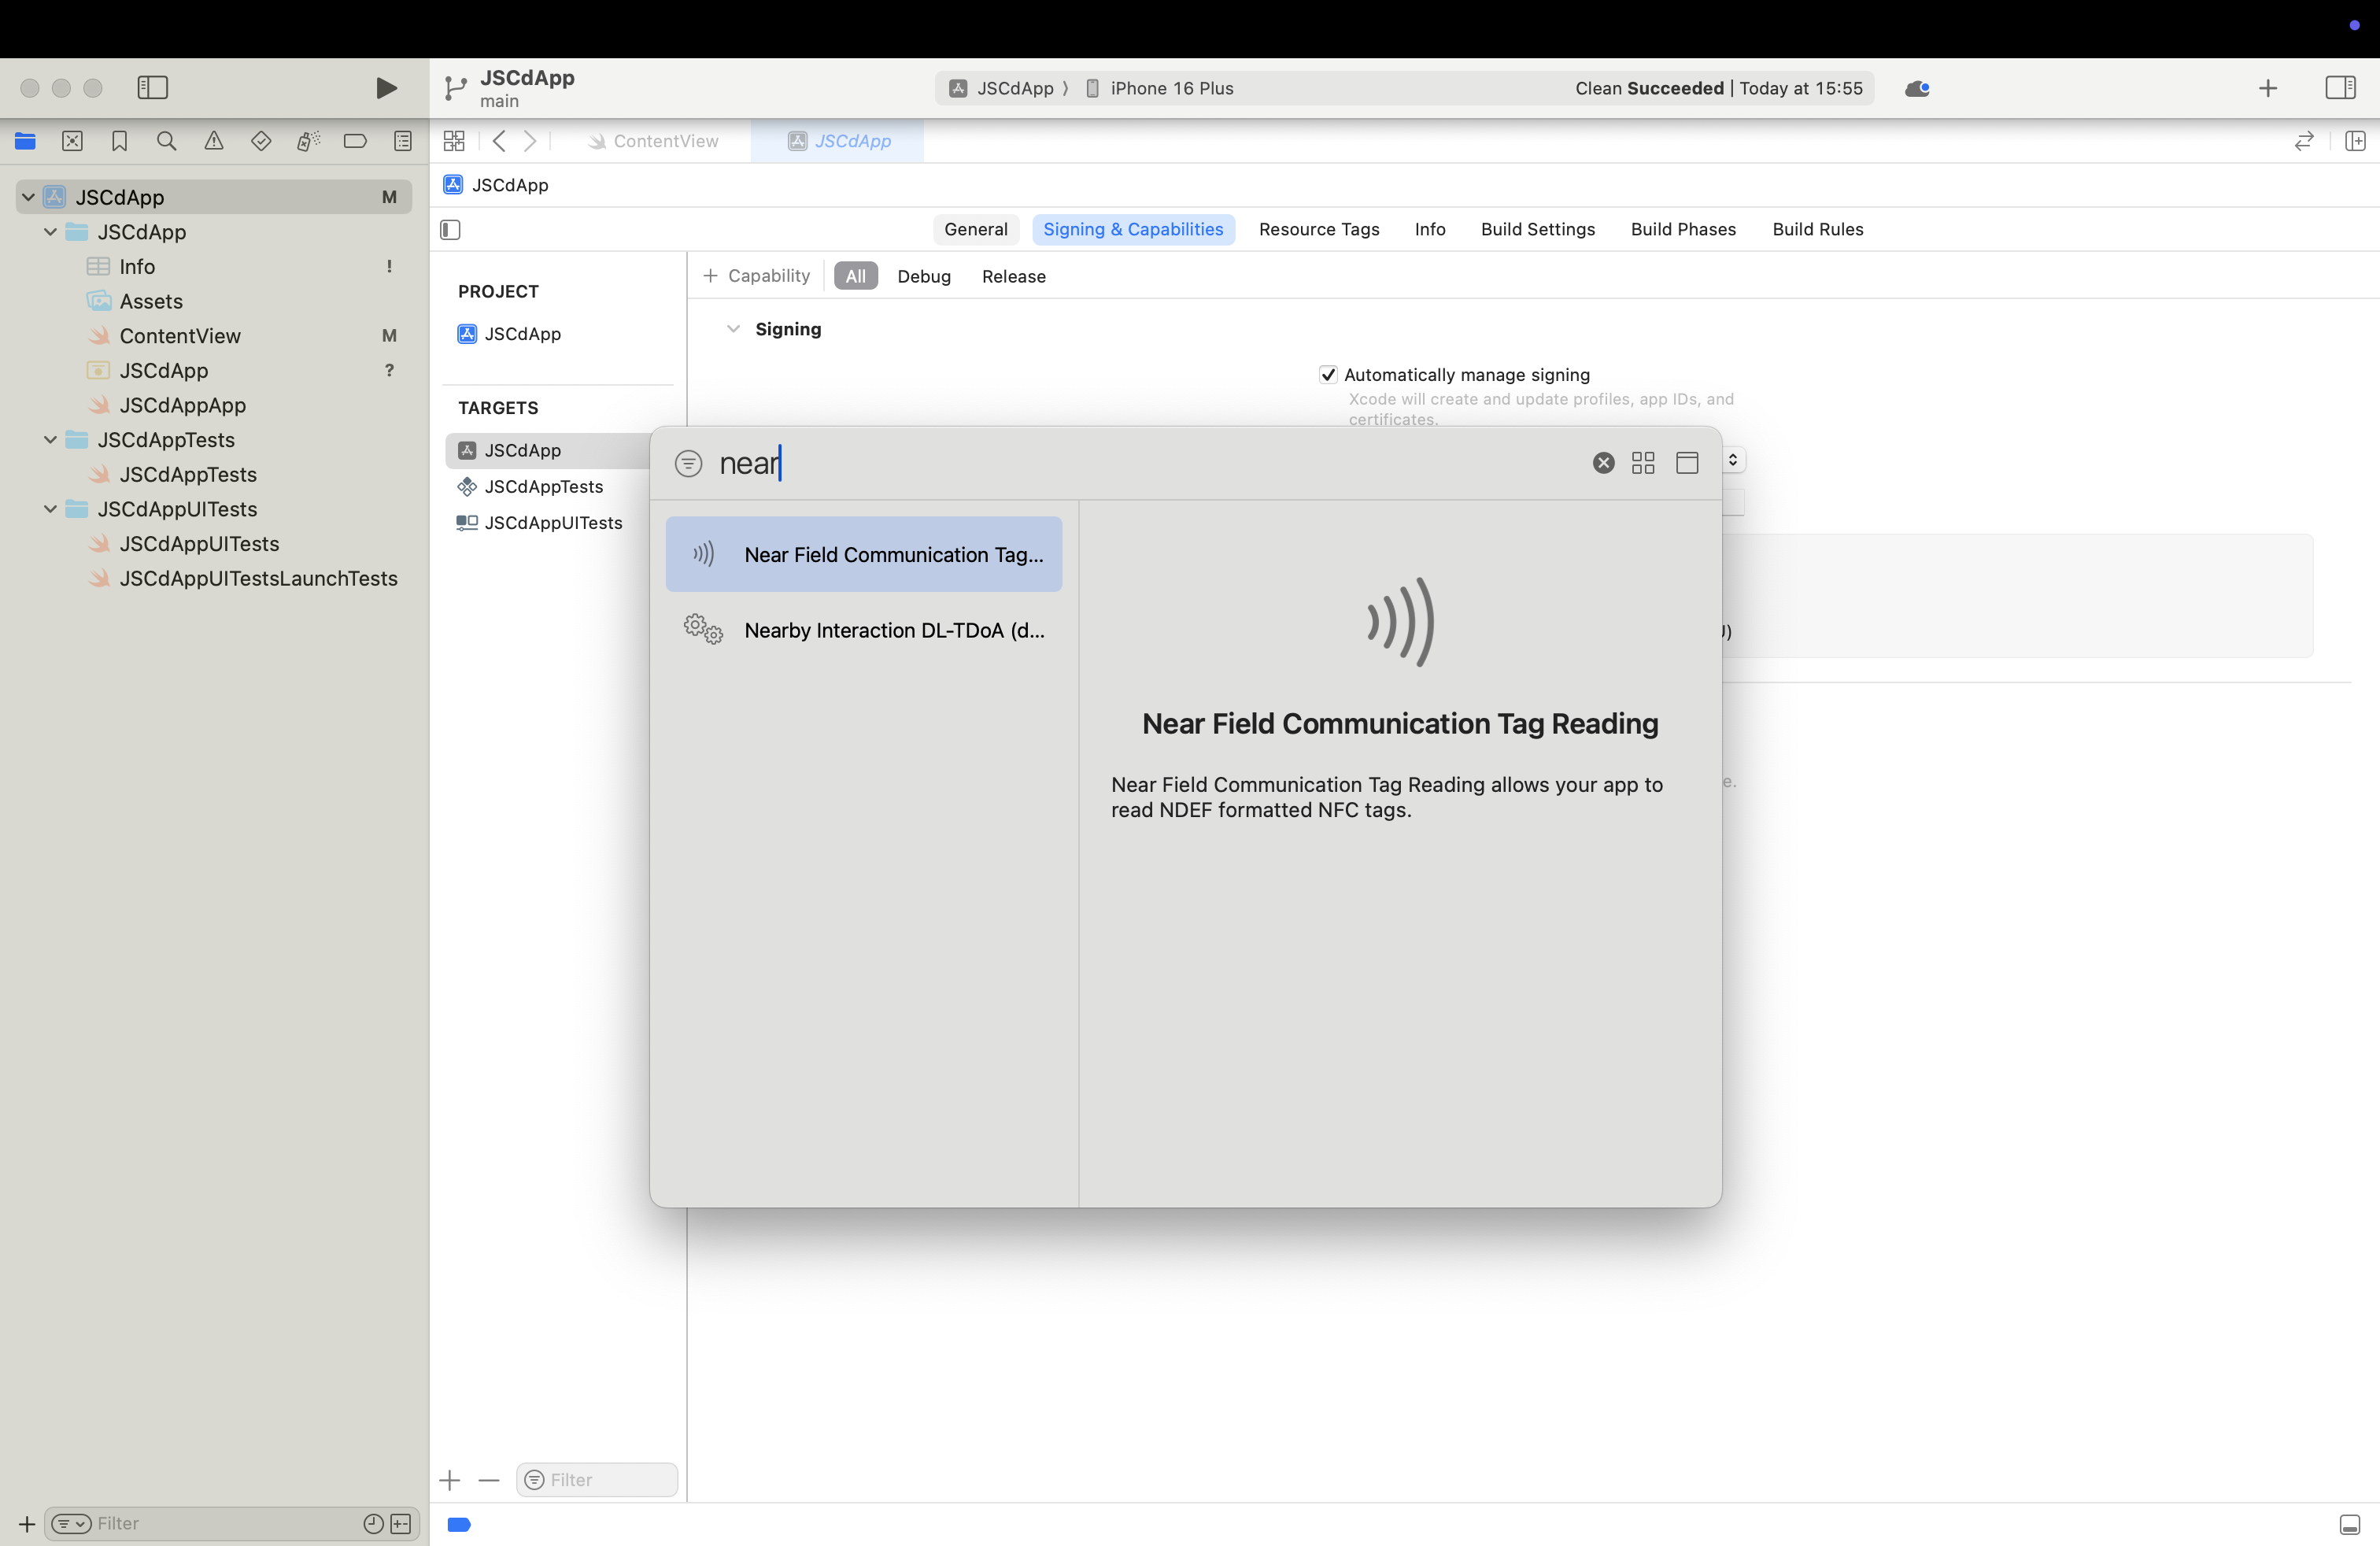
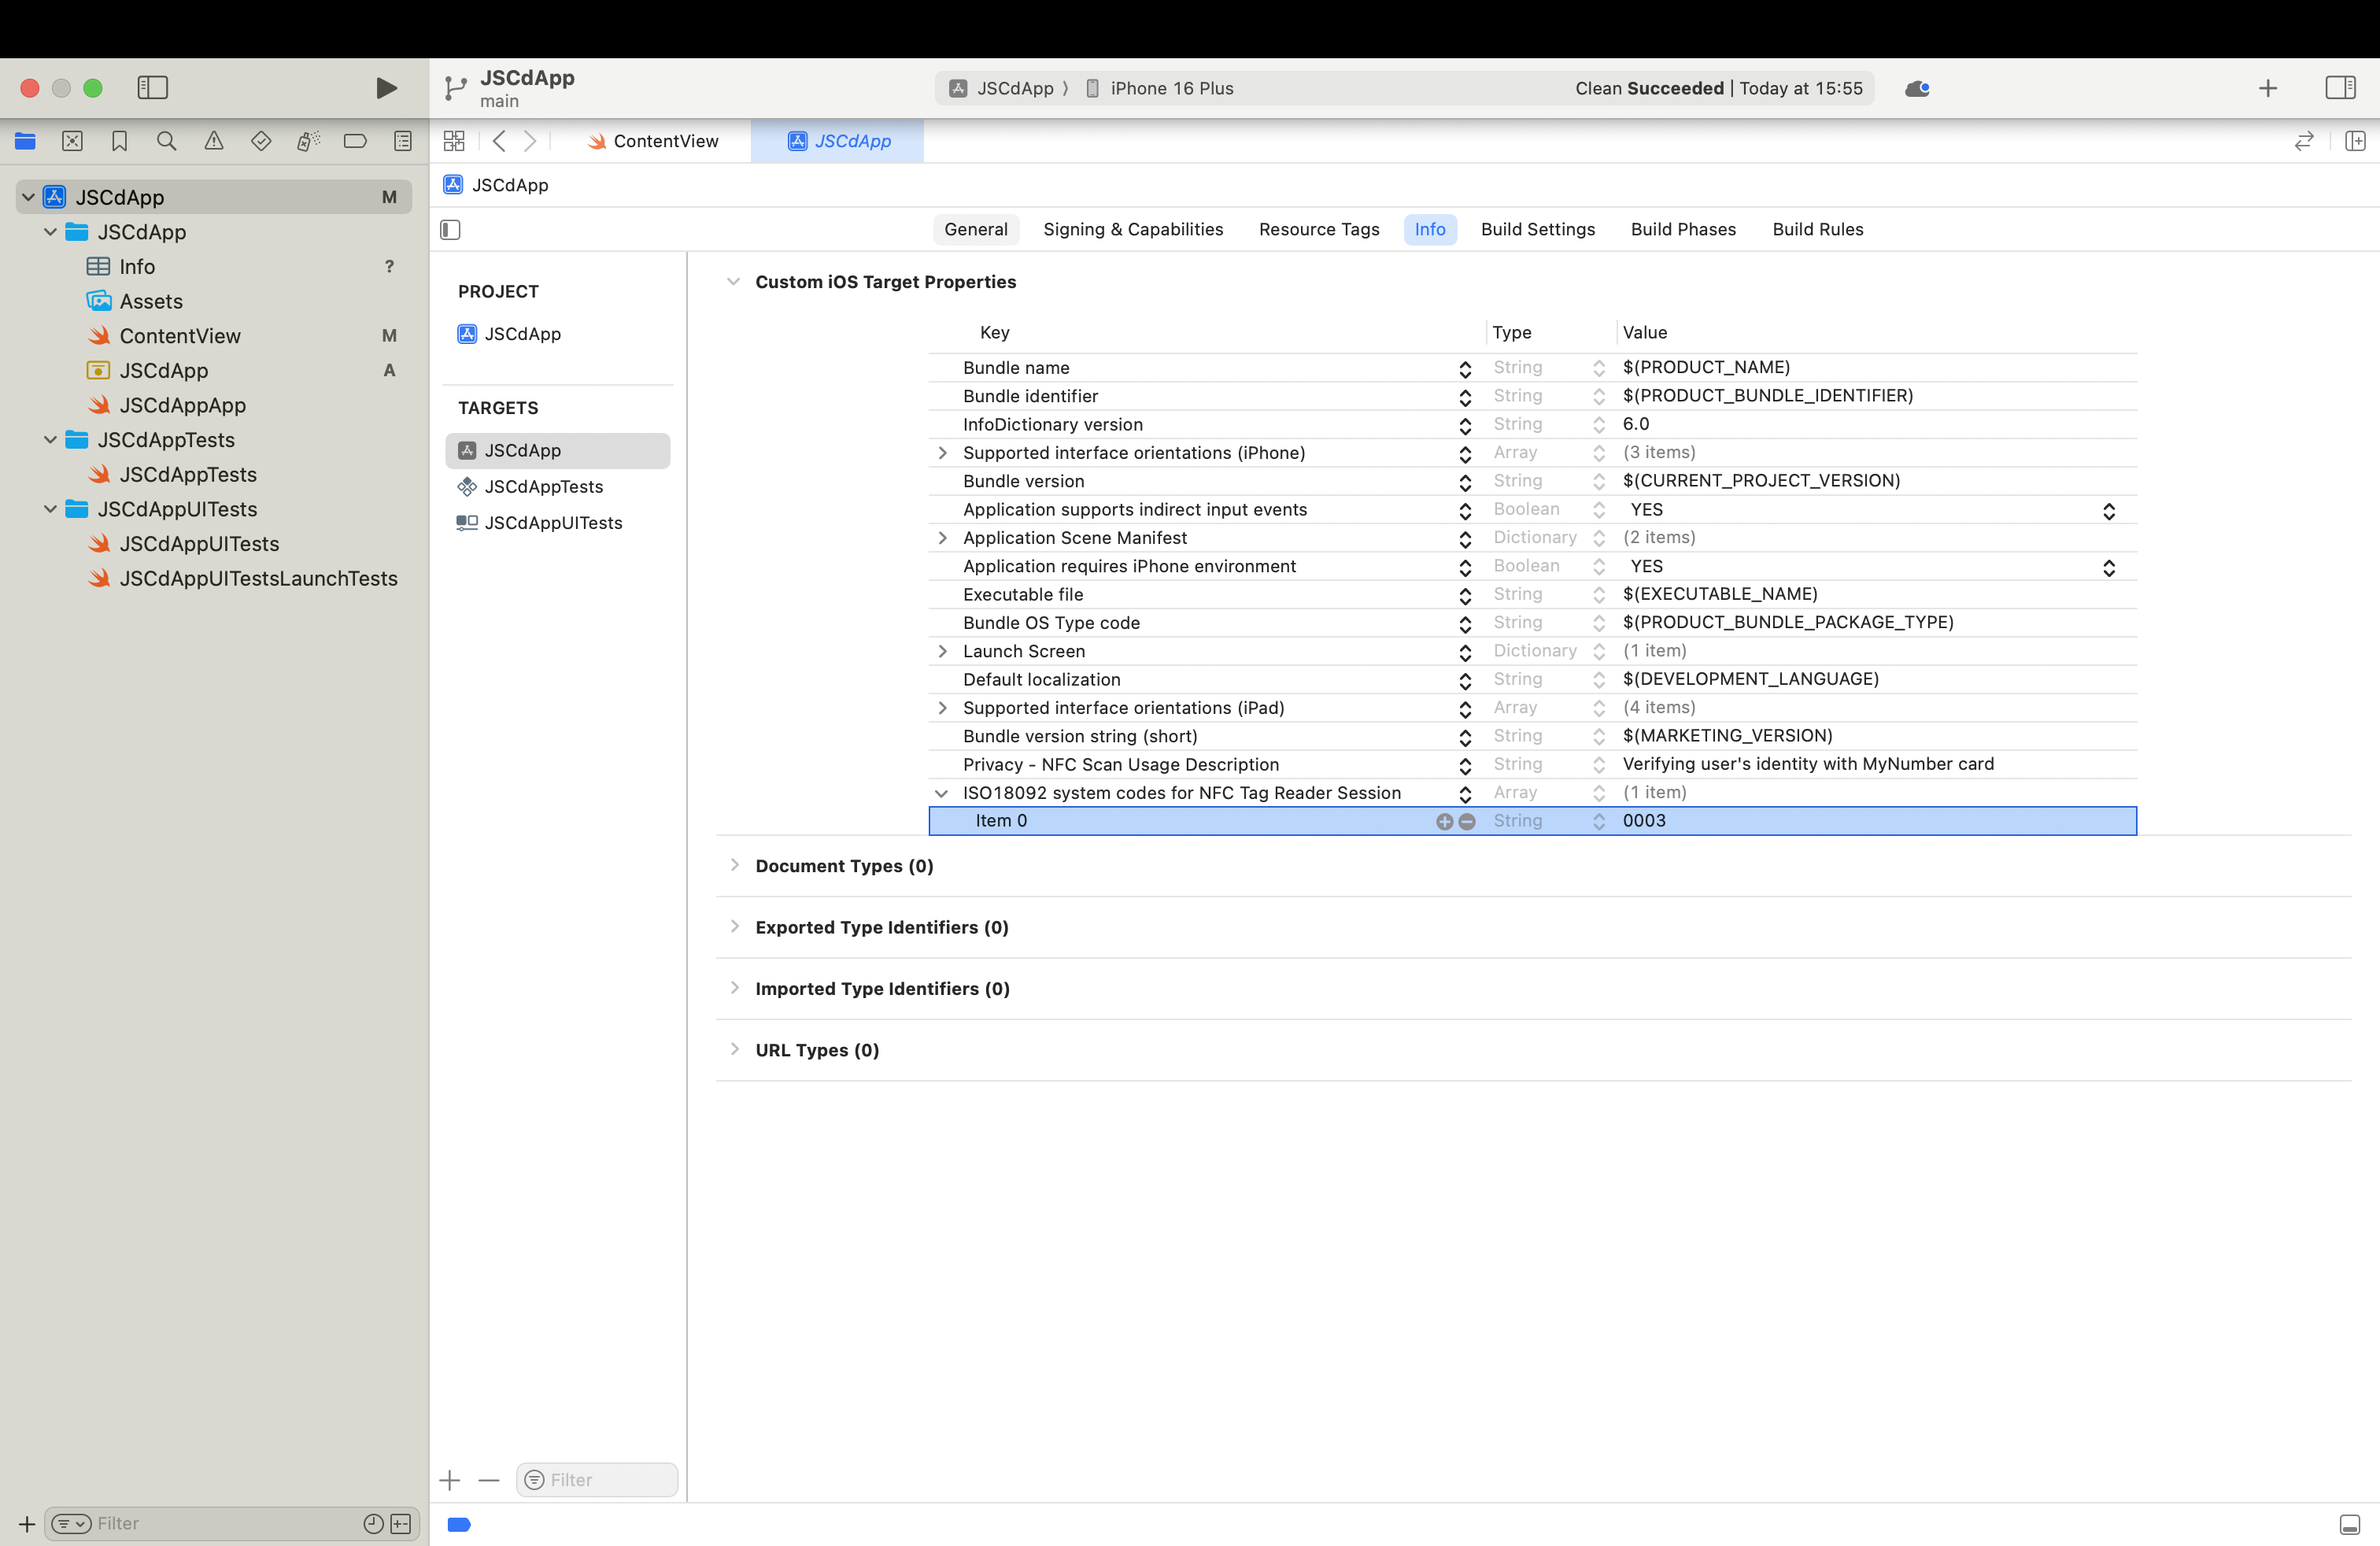
NFC setup for iOS projects
Add NFC permission to your AndroidManifest.xml:
<?xml version="1.0" encoding="utf-8"?>
<manifest xmlns:android="http://schemas.android.com/apk/res/android"
    xmlns:tools="http://schemas.android.com/tools">

    <!-- NFC permission for MyNumber card scanning -->
    <uses-permission android:name="android.permission.NFC" />

    <!-- Declare NFC feature (optional: required=false for non-NFC devices) -->
    <uses-feature
        android:name="android.hardware.nfc"
        android:required="true" />

    <application android:name=".MyApplication">
        <!-- Your activities -->
    </application>
</manifest>
Runtime NFC Check:
// Check if device supports NFC
val nfcAdapter = NfcAdapter.getDefaultAdapter(context)
if (nfcAdapter == null) {
    // Device doesn't support NFC
    showError("NFC is not available on this device")
    return
}

if (!nfcAdapter.isEnabled) {
    // NFC is disabled - prompt user to enable
    showError("Please enable NFC in device settings")
}
4. Set Up PII Encryption Keys
After successful KYC, Mizuhiki returns user PII as encrypted JWE data.
Before going live, generate a public/private key pair for your integrator backend.
- Generate a key pair (example using OpenSSL + RSA):
# Private key (keep this secret)
openssl genpkey -algorithm RSA -pkeyopt rsa_keygen_bits:2048 -out mizuhiki-pii-private-key.pem

# Public key (share this with Japan Smart Chain)
openssl rsa -pubout -in mizuhiki-pii-private-key.pem -out mizuhiki-pii-public-key.pem
- Store the private key only on your backend (for example, KMS, secret manager, or encrypted vault).
- Do not commit the private key to git or include it in your mobile app bundle.
- Share the public key with Japan Smart Chain so encrypted PII can be returned to your system.
- Keep the private key server-side only.
- Restrict access to backend services that decrypt PII.
- Rotate keys immediately if exposure is suspected.
Next Steps
After completing the SDK installation and setup, you're ready to integrate Mizuhiki ID into your application.
What's Next:
- Initialize the SDK - Set up the Mizuhiki client in your app
- Implement KYC Flow - Add user verification functionality
- Issue Verified SBTs - Mint soulbound tokens to user addresses
Continue to: Verify Users Guide →
Getting Started Checklist
- iOS
- Android
-
Development Environment
- Xcode 16.0+ installed
- Apple Developer Program membership active
- iOS 16.0+ deployment target set
-
SDK Installation
- Swift package registry configured with token
- Mizuhiki SDK added to project dependencies
- Project builds successfully
-
NFC Configuration
- NFC Tag Reading capability added
- Privacy usage description configured
- ISO18092 system codes added to Info.plist
-
Ready for Integration
- Project ID obtained from JSC
- PII key pair generated (private key stored securely)
- Public key shared with JSC
- Ready to implement KYC flow
-
Development Environment
- Gradle 7.0+ configured
- Minimum SDK 26 (Android 7.0) set
-
SDK Installation
- Maven repository configured with token
- Mizuhiki dependencies added to build.gradle.kts
- Project syncs and builds successfully
-
NFC Configuration
- NFC permission added to AndroidManifest.xml
- NFC feature declared (optional)
- Runtime NFC check implemented
-
Ready for Integration
- Project ID obtained from JSC
- Environment variable MIZUHIKI_TOKEN set
- PII key pair generated (private key stored securely)
- Public key shared with JSC
- Ready to implement KYC flow
Troubleshooting Installation
Common Issues:
| Problem | Platform | Solution |
|---|---|---|
| Package registry authentication failed | iOS | Re-run swift package-registry login with correct token |
| Dependency resolution failed | Android | Check MIZUHIKI_TOKEN environment variable is set |
| NFC capability missing | iOS | Ensure Apple Developer Program membership is active |
Need Help?
- 📧 Contact [email protected]
- 📚 Review Verify Users Guide for implementation details